Arts and Crafts: Making Your Very Own Dreamcatcher

There’s no better way to wave goodbye to nasty nightmares and say hello to sweet dreams than with a delicate dreamcatcher…and today, we’re going to teach you how to make your very own! If you’re up for a bit of DIY, and find Arts and Crafts as relaxing as we do here at Mecca, we reckon you’re in for a good time. Don’t forget to take a snap of your amazing creation and tell us what you think!
Making a Dreamcatcher: A Step-By-Step Guide
You will need: 1 5 inch metal hoop, 1 metre of suede lace, 1 ball of embroidery floss, 3 feathers with a loop for hanging, and beads. The colour choice is up to you! You can add natural gemstone beads if you’d like to add a bit of extra oomph to your dreamy creation. A big eye needle for threading the beads is optional (depending on the beads and your experience with sewing)!
Instructions:
- Start by wrapping the suede lace around the metal hoop, leaving a ‘tail’ of about 6 inches at the top of the hoop.
- Keep wrapping the suede lace around the metal hoop, keeping it as tight as you can.
- Once you reach the end, nestle the suede lace so there’s no metal showing. Both tails should be pointing up.
- Tie a tight knot at the base of the tails, right at the top of the hoop. Then, tie another knot at the ends of the tails. This will be used to hang the dreamcatcher.
- Tie one end of the embroidery floss around the suede lace knot at the top of the dreamcatcher.
- Bring the embroidery floss around through the inside of the hoop, over the top of the hoop, and back through the loop that was created by the embroidery floss.
- Continue this motion around the hoop, until you have wrapped it around the hoop 12 times and are back at the top. Leave a bit of slack in the embroidery floss.
- Do the same thing again around the hoop – but instead of wrapping around the outside of the hoop, wrap around the middle of the embroidery floss loop.
- Keep wrapping around and around, pulling it slightly tighter each time. You can add in the beads at any point during this process. Depending on the size of the hole in your beads, you may need to use a needle to thread them onto the embroidery floss.
- When you’ve gone around as much as you want to, pull the end of the embroidery floss to tighten the web. Tie it with a secure knot.
- Thread the embroidery floss through the loops at the top of the feathers (or tie them firmly if your feathers don’t have loops). You can add as many beads as you like on each of the strings.
- Tie the feathers and beads onto the dreamcatcher and loop them evenly along the bottom.
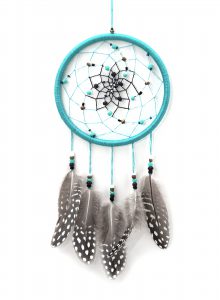
Lo and behold… your magical summer dreamcatcher is complete!